YOUR SURFACE IS A STAGE WITH YOUR SUBJECTS AS THE PLAYERS AND PROPS.
In our previous tutorials, we touched upon some basic techniques for emphasizing volume in our subject and maintaining that sense of volume when adding biographical details. For simplicity we concentrated on one object isolated on the page, and this is fine for a portrait style artwork. However as we continue in our desire to equate our artistic vision with our subject’s look and character, the environment it inhabits becomes more and more relevant.
Adding a world for your subject to interact with gives more scope to describe the subject and importantly expands the possibilities to enhance the sense of depth.
Creating that sense for the viewer of being able to step into the world of your artwork brings an emotional link between the viewer and the subject that gives your work more power and presence. That is something worth working towards!
When we think of creating this 3 Dimensional environment I like to use the analogy of a theatrical stage. If we view this stage at an angle (Figure 1) we note that it has depth as well as width and height. With this in mind you can defeat the tyranny of the 2 dimensional surface and reach into the depths of the stage and position your players and props as you wish.

It is this act of positioning the players and props that I want to discuss in this tutorial. Whether you are working from life or using a photo, the awareness of certain techniques, when used with subtlety and discretion, will enhance the volume and depth in your artwork.
We will be working with an expanded ‘cast’, observing the interaction and effect on colour, tone, line, edge and size, as objects are positioned within the stage. For the sake of our illustrations each object is exactly the same size, colour, and texture. They can represent anything, from the subject, to a leaf, tree, branch, distant hill or building. However their placement within the stage environment will dramatically influence the way they appear to us from our viewpoint and the sense of depth within the artwork.
A fundamental rule applies that all things are affected consistently, related to the horizontal plane (position on stage) that they occupy.
Linear Perspective
As we all know there have been many weighty tomes written on the subject of perspective. From the 5th Century B.C. with the art of the Ancient Greeks, artists have been using perspective to create an illusion of depth. For the sake of our brief tutorial I shall mention only the basics that represent a good starting point for further study.
Any ‘stage environment’ has fundamentally two frames of reference. The first is the viewer’s position and the second is an implied horizon line in the background, running horizontally across the picture plane. This horizon line represents objects infinitely far away and will be higher or lower relative to the eye line of the viewer. It can be determined quickly by holding a pencil horizontally in front of your eyes and then straightening your arm to full stretch. The horizon line should correspond to the line of the pencil.
Parallel lines in your subject will be seen to converge on this horizon line to a point known as the Vanishing Point (VP). This is the standard ‘receding railroad track’ phenomenon. For most geometric forms there will be two vanishing points, either side of the object (2 Point Perspective).
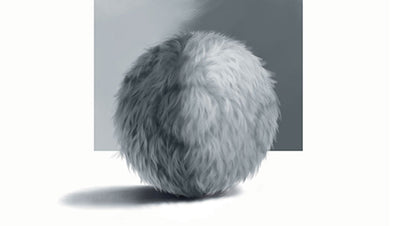
Unlike buildings our subjects are organic and lack definite parallel lines. However, all forms can be related to simple geometric shapes. Even our species of ‘Furry Ball’ can be contained within a shape that observes basic rules of perspective (Figure 2).

Simply stated, objects will appear to diminish in size and appear closer together as they move towards the horizon line or background.
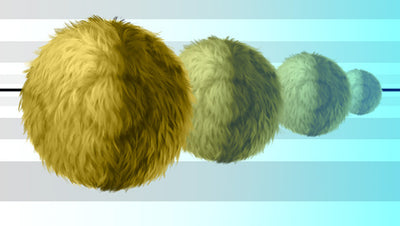
Atmospheric Perspective
Atmospheric perspective or as it is sometimes called, aerial perspective refers to the effect the atmosphere has on the appearance of an object as it is viewed from a distance.
If you take a nice drive out to the Yarra Valley, find a high vantage point and look out into the distance you will see a classic example of atmospheric perspective.
The trees you see nearby are exactly the same as those on the hill 20 miles away. They are the same colour, texture and size, yet they appear so different in every way. Imagine then, layer upon layer of atmosphere, like thin veils of colour between you and the subject. As the distance between you and the objects in the landscape increases, more of these layers accumulate, imparting subtle effects upon the characteristics of the object. The contrast between the object and its background decreases, and the contrast of any markings or details within the object also decreases. The colours of the object also become less saturated and shift towards the atmospheric colour, which is usually blue, but under some conditions may be grey, on an overcast day, or red at sunrise or sunset.

The fundamental rules to remember are:
As your object moves into the distance it becomes progressively
- Cooler and less intense in colour
- More blue or grey in colour depending on the quality of the light source.
- Less contrasting.
- Softer edged.
As your object moves toward the foreground it becomes progressively
- Warmer and more intense.
- Less blue or grey depending on the quality of the light source.
- More contrasting.
- Harder edged.
Figure 3 demonstrates this effect on our objects as they move towards the distance.
Extra Stuff

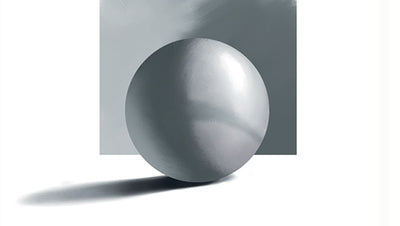
Figure 4 illustrates some extra techniques that may be useful in creating the illusion of infinite depth to your artwork. The use of overlapping objects, most common in still life painting, has been utilized for many centuries in the arts. Overlapping objects on our stage implies the impression of depth and recession and imparts a sense of intrinsic volume to each object.
The use of directional lines, such as a branch, a grouping of objects, or a gesture or look may be used as a device to invite the viewer into the world you have created. These lines should always lead your eye back into the artwork. They will also be governed by the rules of linear and aerial perspective.
A foreground shadow, cast across the front of the stage draws the viewer into the composition, towards the lights on our subject. Look to the Dutch paintings of the 17th Century for classic examples of this technique.
Remember you are the director and you have complete control of the potential of you production. You can position your players and props, control the lighting and story, to create a powerful and compelling experience for the viewer. ‘Break a leg!’